3-2-1 Backup: Setting Up Raspberry Pi for Time Machine
Updates:
April 20th, 2022. The note on Raspberry Pi OS Bullseye April 2022 update is added.
This post is a step-by-step, start-to-finish guide to configure a Raspberry Pi as a network storage device for macOS Time Machine backups. It is a part of 3-2-1 Backup series.
Note: Please make sure to read the Introduction first.
Prerequisites
Raspberry Pi 4. While you can use almost any model of Raspberry Pi, I recommend Pi 4 simply because it features USB 3.0, which significantly improves speed of writing / reading to and from external hard drives and its Gigabit Ethernet port throughput is not capped at 300Mbps.
I buy kits made by CanaKit. They come with beefier 3.5 amp power supplies guaranteeing there will be enough juice to power an external 2.5 inch spinning hard drive. I also prefer passive cooling cases, and CanaKit has a few SKUs including those - I believe CanaKit rebrands cases made by Flirc. If you decide to go this route, I highly recommend getting a set of heatsinks as well, for some reason aluminum case CanaKit kits come with no heatsinks for memory or IO chips ¯\_(ツ)_/¯
MicroSD card. Raspberry Pi boots from a microSD card. Majority of kits include one, otherwise you will need to get it, 4GB or larger capacity.
MicroSD card reader that works with a Mac. We will be preparing bootable microSD media using a Mac.
External USB hard drive / SSD. Any will do as long as it’s roomy enough for your backup needs and has USB 3.0 interface. I purchased and use Seagate 5TB USB 3.0 2.5 inch external hard drive. Those are sold at Costco (and frequently go on sale). So far it has served me well without any issues.
Ethernet cable. It is a good idea to keep your Raspberry Pi off Wi-Fi network to ensure the best possible performance during backups.
Installing OS
Let’s get our microSD card ready for the first boot of the Raspberry Pi. The steps in this section are performed on a Mac.
First, download and install the official Raspberry Pi Imager software to your Mac.
Run Raspberry Pi Imager and choose Raspberry Pi OS Lite (32-bit) as shown below:
Fig 1. Raspberry Pi Imager Home Screen
Fig 2. Raspberry Pi Imager OS Selection. Raspberry Pi OS Other
Fig 3. Raspberry Pi Imager OS Selection. Raspberry Pi OS Lite
Next, click Choose Storage (middle button on the Raspberry Pi Imager Home Screen) and choose the card reader with the microSD in it.
⚠️ Note on Raspberry Pi OS Bullseye April 2022 update.
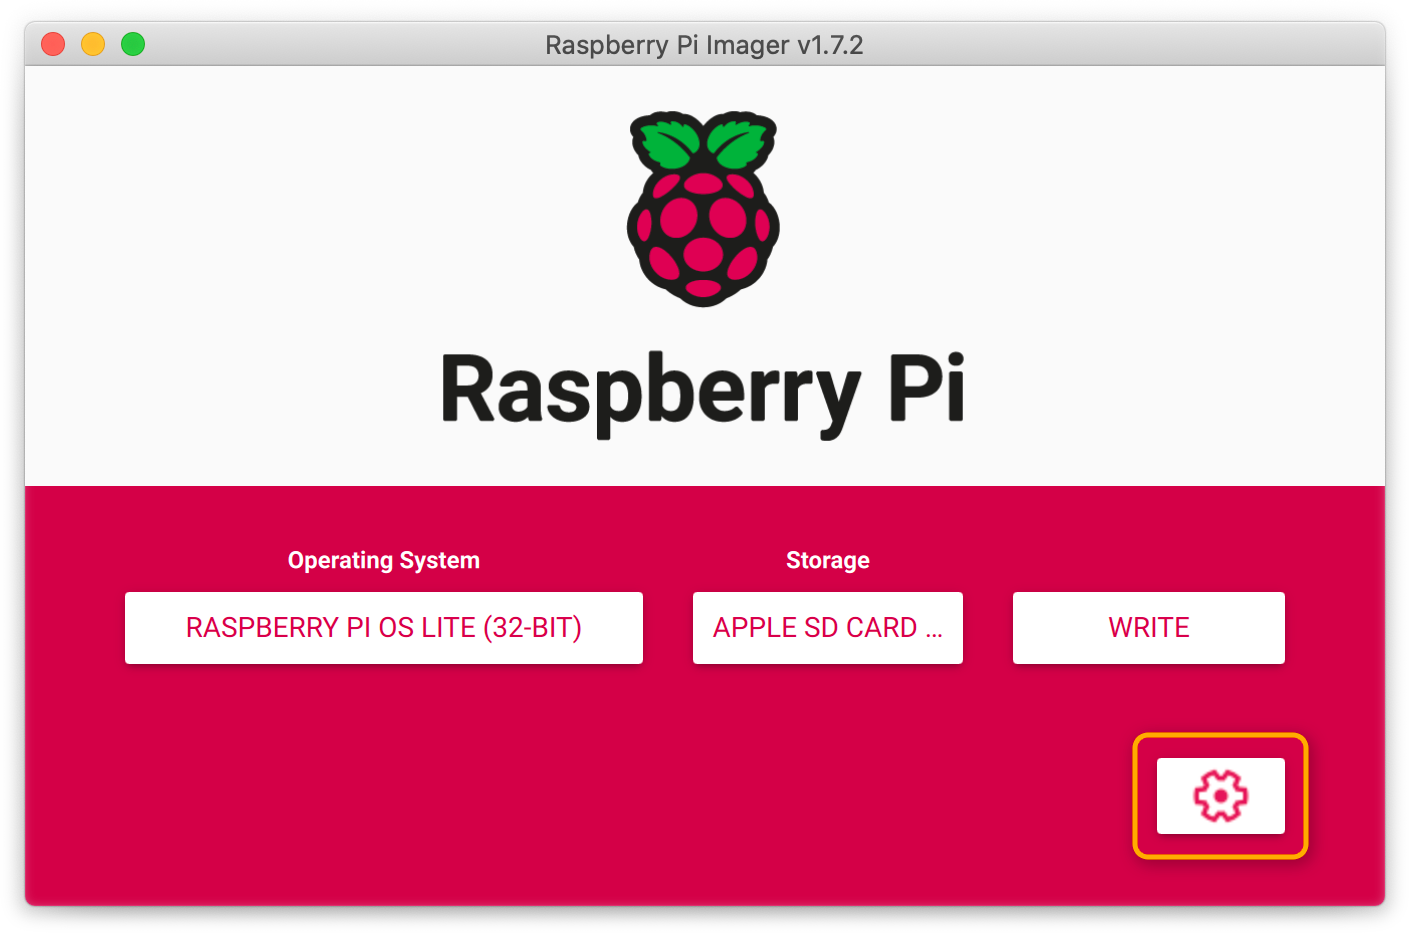
Fig 2022-04-20-Update-1. Interface of Raspberry Pi Imager v1.7.2
In April 2022, Raspberry Pi Foundation introduced several changes, including deprecating the default pi user account. Please refer to Simon Long's blog post for a detailed explanation. Check the version of your Raspberry Pi Imager, and if it is 1.7.2 or later, you have to click on the Cogwheel button to bring Advanced options dialog - please refer to Fig 2022-04-20-Update-2. The shown values for hostname, username, and password revert the Raspberry Pi's behavior to the pre-April 2022 state. While this makes following this guide easier, I would advise choosing a unique username and a strong password for your default user. Doing so increases the security of your Raspberry Pi - just remember to substitute pi with your default user's username everywhere below.
Note that Advanced options dialog now gives an option to enable SSH and provides for setting the hostname and configuring the timezone in advance. Feel free to skip the corresponding steps at the end of this article.
⚠️ Note that the April update has introduced a new behavior enabling automatic console login for the user specified in Advanced options dialog. Not turning it OFF might compromise the security of your Raspberry Pi. Please read this article for more details.

Fig 2022-04-20-Update-2. Advanced Options Dialog of Raspberry Pi Imager v1.7.2
When everything looks good, proceed with writing the selected Raspberry Pi OS Lite to the chosen storage location of the microSD. The process takes anywhere from one to five minutes depending on whether the OS image needs to be downloaded and your broadband connection speed.
Once you see Write Successful dialog box appear, click on Continue button then quit Raspberry Pi Imager.
At this point, the microSD card has been unmounted by Raspberry Pi Imager, but we are not quite done yet. Let’s unplug and then attach the card reader one more time. Then:
Open Terminal on Mac.
From the Terminal window execute:
$ cd /Volumes/boot && touch ssh && cdUnmount / Eject the card.
This last command creates an empty file named ssh in the /boot partition of the microSD card. The presence of this file will make the Raspberry Pi OS enable SSH daemon on the subsequent boot, which is what we want to avoid plugging in a keyboard and monitor to the Pi.
Finishing up:
Insert the microSD into your Raspberry Pi.
Connect Ethernet cable to the ethernet port of your router.
Connect the power and power the Pi up!
Connecting to the Raspberry Pi
A minute or two later, after powering up, your Raspberry Pi should become available on your home network. In most cases, I suspect, you should be able to SSH to it using raspberrypi.local name. If not, then you will need to login to your home router management console and find out the Pi’s IP address from the router device list.
Note: Official Raspberry Pi Documentation has an in-depth coverage of the Remote Access topic.
From here on I assume that the Pi is indeed accessible via raspberrypi.local.
Open Terminal on Mac, enter the following command:
$ ssh pi@raspberrypi.localAgree to accept the Raspberry Pi’s SSH fingerprint to your Mac’s known hosts list.
When prompted, enter the default password raspberry.
On the greeting screen, Raspberry Pi OS warns you about the security risk associated with using the default password other SSH. Do not worry, we will take care of it at the end of the article.

Fig 4. Connecting to Raspberry Pi via SSH
Before diving into anything else, let’s refresh the software packages on our Pi. From the SSH console on your Mac execute:
$ sudo apt update && sudo apt upgrade -y
Preparing the Storage
⚠️ Warning: all data on your external hard drive is about to be permanently deleted. Make sure there is nothing on it that you might regret not having later.
We are going to use Btrfs that does not come standard and needs to be installed first:
$ sudo apt install btrfs-progs -y
Connect external hard drive via USB to one of the blue USB 3.0 ports on the Raspberry Pi.
From SSH console execute:
$ sudo lsblkYou should see the list of devices and partitions present. Note the device name that does NOT have root (/) or boot (/boot) partitions associated with it. In my case this device is sda - refer to Fig 5 below. If your device name is different, you will need to be careful and update all the following commands with the actual name of your external hard drive device.
So, assuming sda, execute:
$ sudo dd if=/dev/zero of=/dev/sda bs=512 count=10000, which zeros out the first ~5MB of the hard drive, erasing any service information like partitions, etc.
Then follow up with creating Btrfs on /dev/sda and labeling it store:
$ sudo mkfs.btrfs -L store /dev/sda

Fig 5. Formatting External Hard Drive
Mounting Backups Partition
Let’s create a directory to serve as the mounting point for the newly created store filesystem:
$ sudo mkdir /mnt/storeTo be able to mount this filesystem on our Raspberry Pi and access it like any other directory, /dev/sda needs to be mounted:
$ sudo mount -t btrfs /dev/sda /mnt/storeLet’s confirm that everything looks good (see Fig 6):
$ sudo lsblkBtrfs is expected to print its basic information as well:
$ sudo btrfs filesystem df /mnt/store

Fig 6. Confirming Btrfs Mount Point
The command below adds an entry to /etc/fstab to ensure that the mount persists between reboots:
$ echo 'LABEL=store /mnt/store btrfs noexec,nodev,noatime,nodiratime,user_subvol_rm_allowed 0 0' | sudo tee -a /etc/fstab
Note of flags used in the command above:
noexec: do not allow execution of any binaries on the mounted filesystem as it’s only going to be used for backup storage;
nodev: do not interpret character or block special devices on the filesystem;
noatime: do not store access times on this filesystem;
nodiratime: do not store directory access times on this filesystem;
user_subvol_rm_allowed: allow btrfs subvolumes to be deleted by their respective owner. Otherwise, only the root user can do that;
The two numbers at the end of the line instruct your Raspberry Pi to ignore this filesystem when using dump and not to check it with fsck when rebooting.
Optional: Putting the External Hard Drive to Sleep
For spinning disks that do not have to run constantly like in our case, it’s not a bad idea to put them to idle when there is no activity. Not only does that prolong disks life, but also reduces carbon footprint.
hdparm is there to help:
$ sudo apt install hdparm -yThen execute:
$ sudo hdparm -S 120 /dev/disk/by-label/store
Here we use -S option to specify the period of inactivity before spinning the drive down. I highly recommend reading more on hdparm options ($ man hdparm is your friend) because according to man pages, “The encoding of the timeout value is somewhat peculiar.” In our case, however, -S 120 instructs hdparm to wait for 10 minutes before spinning down.
We can make this permanent by adding the following to /etc/hdparm.conf:
$ echo -e '\n/dev/disk/by-label/store {\n\tspindown_time = 120\n}' | sudo tee -a /etc/hdparm.conf
Making the Pi Storage Network-Accessible
In this section we will configure two additional packages. Samba makes Btrfs subvolumes accessible over network via Server Message Block protocol (or SMB for short). Meanwhile Avahi is employed to advertise the network shares to Macs as a destination for Time Machine backups.
Let’s start by creating a Btrfs subvolume for Samba to use as a sharing point. We will call it backups:
$ sudo btrfs subvolume create /mnt/store/backups
Creating Backup User
It is a good security practice to limit privileges when possible. For our purposes a regular, non-sudo capable user will suffice. Let’s create one (I call mine scribe):
$ sudo adduser --disabled-password --gecos "" scribeThen set the ownership for the store mount point and everything below, including /mnt/store/backups subvolume to the newly created user scribe:
$ sudo chown -R scribe: /mnt/storeIt’s time to install samba and avahi packages:
$ sudo apt install samba avahi-daemon -y
Configuring Samba
The definition below instructs Samba to make /mnt/store/backups available via SMB. It needs to be added to Samba configuration /etc/samba/smb.conf file:
[backups]
    comment = Backups
    path = /mnt/store/backups
    valid users = scribe
    read only = no
    vfs objects = catia fruit streams_xattr
    fruit:time machine = yes
The following command achieves that:
$ echo -e '\n[backups]\n\tcomment = Backups\n\tpath = /mnt/store/backups\n\tvalid users = scribe\n\tread only = no\n\tvfs objects = catia fruit streams_xattr\n\tfruit:time machine = yes' | sudo tee -a /etc/samba/smb.conf
The default /etc/samba/smb.conf has some fluff like definitions for sharing home directories and printers that we really have no use for. To make it clean and nice:
$ sudo nano /etc/samba/smb.confScroll down to Share Definitions section and comment out [homes], [printers] and [print$]. Fig 7 and Fig 8 show the end result. Look for lines starting with double semi-column, they indicate the lines needing touches. Save the changes by pressing ^O (Conrol+O on Mac keyboard) and exit ^X (Control+X).
Fig 7. Editing smb.conf. 1 of 2
Fig 8. Editing smb.conf. 2 of 2
In order to connect to the SMB share as user scribe, we need to explicitly add user scribe to Samba’s password file and set a password with smbpasswd:
$ sudo smbpasswd -a scribeA quick way to check your Samba configuration is by executing:
$ sudo testparm -sMake sure that your output looks exactly like the one in Fig 9.

Fig 9. Samba Config Check
Finally, reload Samba service to pick up the changes:
$ sudo service smbd reload
Configuring Avahi (And Making It Pretty)
We will use Avahi to advertise the Samba share to Macs via zero-configuration networking and service discovery protocols. When built with mDNS support, Samba can do it on its own. Unfortunately, the build of Samba currently available for Raspberry Pi OS Lite does not have this functionality. Avahi will help us to make Macs aware that:
Raspberry Pi runs SMB server on port 445.
There is an SMB share point available for Time Machine backups.
As a bonus (this is the pretty part), we are also going to advertise our Raspberry Pi as a Time Capsule so that it appears in the Finder sporting a classic Time Capsule graphics.
We are going to create file /etc/avahi/services/samba.service and populate it with the following XML:
<?xml version="1.0" standalone='no'?><!--*-nxml-*-->
<!DOCTYPE service-group SYSTEM "avahi-service.dtd">
<service-group>
  <name replace-wildcards="yes">%h</name>
  <service>
    <type>_smb._tcp</type>
    <port>445</port>
  </service>
  <service>
    <type>_device-info._tcp</type>
    <port>9</port>
    <txt-record>model=TimeCapsule</txt-record>
  </service>
  <service>
    <type>_adisk._tcp</type>
    <port>9</port>
    <txt-record>dk0=adVN=backups,adVF=0x82</txt-record>
    <txt-record>sys=adVF=0x100</txt-record>
  </service>
</service-group>
Invoke nano text editor:
$ sudo nano /etc/avahi/services/samba.servicePaste the above XML. Save the changes by pressing ^O (Conrol+O) and exit ^X (Control+X).
Restart Avahi:
$ sudo service avahi-daemon restart
Testing It All
At this point, using your Mac, you should be able to see raspberrypi listed in Network section of the Finder. Next, open Time Machine from System Preferences…, click on Select Disk… and confirm that you see backups on raspberrypi.local as an option. Do not configure your Mac’s Time Machine just yet though.
Configuring Timezone
Having the timezone properly configured avoids confusion when working with time-based services like cron or even when reading through logs.
From SSH console run:
$ sudo raspi-configNavigate to 5 Localisation Options -> L2 Timezone.
Select your Geographic area and Time zone, then commit the change.

Fig 10. Updating Timezone Settings
Securing the Raspberry Pi
Let’s address that security warning on the Raspberry Pi’s greeting screen now.
Skip this step if raspsi-config is already running. From SSH console run:
$ sudo raspi-configNavigate to 1 System Options -> S3 Password to change the default password for user pi.

Fig 11. Changing System Password
Renaming the Raspberry Pi
Skip this step if raspsi-config is already running. From SSH console run:
$ sudo raspi-configNavigate to 1 System Options -> S4 Hostname.
Enter a new hostname to your liking. I call my Raspberry Pi scribe, so this is what you are going to see on the screenshots that follow.
Click Tab key to select Ok,
Click Tab key twice to Finish.
Choose Yes to reboot.

Fig 12. Changing System Name
Once your Raspberry Pi comes back online, it should be accessible by its new name - in my case:
$ ssh pi@scribe.localYou Mac’s Finder should also reflect the new name.
Summary
At this point, your Raspberry Pi is ready to serve as a network destination for Macs’ Time Machine backups. However, I would suggest proceeding to the next step before starting regular backups. It is easier to test cloud sync while transfering small volumes of test data compared to gigabytes of actual Time Machine backups.
Having said that, if you decide to do otherwise, then on each of your Mac computers, go to System Preferences… -> Time Machine, select Select Disk… and pick your Raspberry Pi from the list. You will need to provide credentials for the scribe Samba user. Note: I highly recommend checking Encrypt backups option and choosing a strong password.
Next part: Setting Up Raspberry Pi for Cloud Sync
Keep it Safe. Back Up!